Do you have an Android phone right now? If so, it’s likely you’ve unlocked your screen using a lock pattern . Only you know the combination of the nine movements maximum that give you access to all the information available on your device, so creating a good one is a must.
Many use something simple and accessible to prevent them from forgetting it, but others are creative about making amusing patterns. In this tutorial, we’ll show you five great, simple lock patterns for your Android cell phone.

Pattern 1
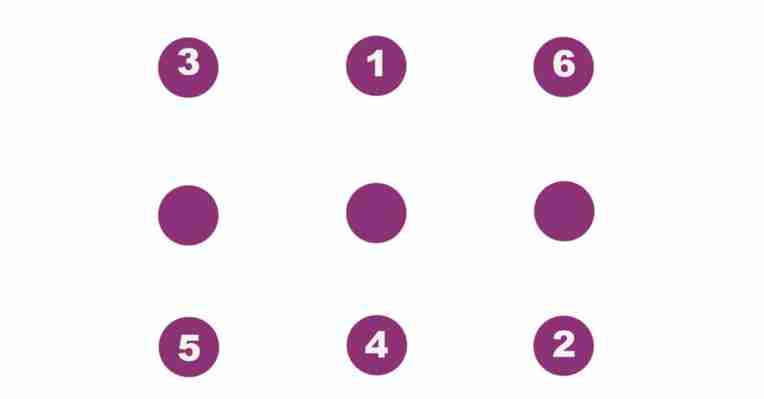
In general, people often resort to very basic patterns to unlock their cell phones, but this means that security is considerably reduced. The first lock pattern involves an easy, but uncommon combination. Point 1 starts in the upper middle and goes to 2, in the lower right-hand corner. Then we cross the screen to 3, back down to 4 in the lower middle, left to 5 and to the upper right-hand corner at 6.

Pattern 2
This is one of the most classic patterns, which we’re taught when we’re little: a house . The most accessible way is to start from the lower left-hand corner at 1, go up to square 2, again to 3 in the upper middle, then down to the right middle at 4, and finally to the lower right-hand corner at 5. Our house drawing, on our Android .
Pattern 3
Do you like Mario Bros? In case you haven’t noticed, this pattern makes the letter “M,” one of the easiest lock patterns to make. It’s as simple as starting in the lower left-hand corner at 1, going up to the upper left-hand corner at 2, going right to the middle at 3, going back up to the upper right-hand corner at 4 and finishing in the lower right-hand corner at 5.
Pattern 4
We’ve enjoyed starting in the lower left-hand corner, so we’ll start from there again. Now, from 1 we’ll go to the upper right-hand corner at 2, to the upper middle at 3, down to the left middle, over to the lower right-hand corner at 5, and finish by going up to the right middle at 6.
Pattern 5
We’ll wrap up with what we think is the most difficult pattern of all , because of the twists and turns. We’ll start in the middle at 1 and go to the upper right-hand corner at 2, then to the upper left-hand corner at 3, go down to the lower right-hand corner at 4, go over to the lower left-hand corner at 5, and head up to the upper middle at 6. We’ve made different triangles on the screen, so if somebody was looking over our shoulder, they wouldn’t know where we started.
What about you, which one do you like best? Don’t miss the chance to post your own combinations in the comments. We haven’t shown the most difficult ones, but rather a mix of nice patterns and more complex ones.